Hey everyone welcome back to our web audio series! This week we’re going to have some fun playing around with Web Audio API and the HTML5 Canvas element! Remember a few weeks back we did a tutorial on visualising waveforms with Web Audio API? We’ve barely scratched the surface of how amazingly powerful the HTML5 Canvas can be. This article has several great examples. For this week, we’re going to learn on how we can integrate Web Audio API with simple web animations created using the HTML5 Canvas element.
An example of that would be this: Hover your mouse below to trigger the animation.
Part I: Drawing & Animating the ball
Are you ready? Let’s recap on what is the HTML5 Canvas!
</h4>“Added in HTML5, the HTML canvas element can be used to draw graphics via scripting in JavaScript. For example, it can be used to draw graphs, make photo compositions, create animations, or even do real-time video processing or rendering.”</h4> Source
So the <canvas> element is basically a rectangle on our page that lets us draw stuff on it using Javascript. In HTML, the <canvas> tag is mostly used to define the width & height. Drawings on the canvas itself are created using Javascript where we use drawing functions & methods which is also known as the Canvas 2D API.
Let’s start by learning how to draw a ball.
First we have to create a <canvas> context. On our HTML it would look like this.
<canvas id="canvas" width="300" height="225"></canvas>
We included this canvas with an ID attribute so that we can find it in the DOM. Then we add this line of code which initialises its 2d context for drawing. The drawing context is where all the drawing methods and properties can be defined.
var ctx = canvas.getContext('2d');
We start by first creating a ball object, which will contain all the methods and variables specific to the ball.
var ball = {
  x: 500,
  y: 200,
  vx: 16,
  vy: 4,
  radius: 200,
  color: 'gold',
Then we start drawing the ball.
draw: function() {
  ctx.beginPath();
  ctx.arc(this.x, this.y, this.radius, 0, Math.PI*2, true);
  ctx.closePath();
  ctx.fillStyle = this.color;
  ctx.fill();
}
HTML canvas beginPath() Method
It begins a path, or resets the current path.
HTML canvas arc() Method
It creates an arc/curve (used to create circles, or parts of circles).
| Parameters | Description |
| x | The x-coordinate of the center of the circle |
| y | The y-coordinate of the center of the circle |
| r | The radius of the circle |
| sAngle | The starting angle, in radians (0 is at the 3 o'clock position of the arc's circle) |
| eAngle | The ending angle, in radians |
| counterclockwise | Optional. Specifies whether the drawing should be counterclockwise or clockwise. False is default, and indicates clockwise, while true indicates counter-clockwise. |
HTML canvas closePath() Method
The closePath() method creates a path from the current point back to the starting point.
HTML canvas fillStyle() Method
The fillStyle property sets or returns the color, gradient, or pattern used to fill the drawing.
HTML canvas fill() Method
The fill() method fills the current drawing path.
Another method that would be useful would also be fillRect(),
HTML canvas fillRect() Method
The fillRect() method draws a filled rectangle. The default color of the fill is black.
Once we have drawn the ball, it’s time to create the animate() function!
function animate() {
  ctx.clearRect(0,0, canvas.width, canvas.height);
  ball.draw();
  ball.x += ball.vx;
  ball.y += ball.vy;

  if (ball.y + ball.vy > canvas.height || ball.y + ball.vy < 0) {
    ball.vy = -ball.vy;
    play();
  } else {
    stop();
  }

  if (ball.x + ball.vx > canvas.width || ball.x + ball.vx < 0) {
    ball.vx = -ball.vx;
    play();
  }

  raf = window.requestAnimationFrame(animate);
};
Don’t worry if you can’t understand what’s going on in the code, I will explain to you what happens line by line.
This line of code clears the trail that the ball leaves when ever it moves around.
ctx.clearRect(0,0, canvas.width, canvas.height);
Without it, our animation would look like this.
The next line we shall call our draw() function. This is to ensure that our ball gets re-drawn every time our animate() function is called.
ball.draw();
Now we’re going to add velocity to the ball. Every time our animate() function is called, the coordinates of the ball changes.
ball.x += ball.vx;
ball.y += ball.vy;
Another way to understand how this works is to see this awesome example by Kushagra Agarwal. He has a detailed explaination on how to add velocity and acceleration to the ball.
Moving on from that, don’t forget to add boundaries or else our ball will run out of the canvas like this.
So if you don’t want to say goodbye to your ball, we must add these codes.
if (ball.y + ball.vy > canvas.height || ball.y + ball.vy < 0) {

  // If the ball goes beyond the canvas height,
  // move the ball the opposite direction.
  ball.vy = -ball.vy;

}
if (ball.x + ball.vx > canvas.width || ball.x + ball.vx < 0) {

  // If the ball goes beyond the canvas width,
  // move the ball the opposite direction.
  ball.vx = -ball.vx;
}
These codes ensure that if the ball goes beyond the canvas boundaries, its direction will be inverted.
For reference, the canvas grid or coordinate space looks like this.
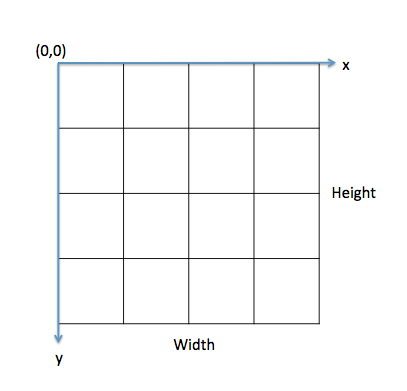
If you need help understanding what some of those operators mean click here.
For the last line of code in our animate() function, we call the window.requestAnimationFrame() method.
var raf = window.requestAnimationFrame(animate);
This requestAnimationFrame method tells the browser that we want to perform an animation and requests the browser to call the animate() function to update the animation before the repaint. We then store this inside the variable raf.
Why do we need to store it inside a variable?
This is because in order to stop the animation, we have to call cancelAnimationFrame.
window.cancelAnimationFrame(raf);
By now you might notice that the animation only occurs when you hover your mouse over the canvas element. This is due to the EventTarget.addEventListener() method which attachs an event handler to a specified element.
canvas.addEventListener("mouseover",function(){
  if (!running) {
    window.requestAnimationFrame(animate);
    running = true;
  }
});

canvas.addEventListener("mouseout",function(){
  window.cancelAnimationFrame(raf);
  running = false;
});
Now it’s time for you try playing around with the code! See if you are able to make the ball move faster or slower!
See the Pen Bouncing Ball (No Sound) by Aqilah Misuary (@aqilahmisuary) on CodePen.
Click here for Part II!
Thank you for following Sonoport’s webaudio API tutorials! For any feedback/questions please email me at aqilah@sonoport.com.