Hi everyone! Welcome to the new year! We’re excited to kick off our first blog post for 2016 with something really fun and simple to do! Synthesising sounds with web audio! Our main reference will be this blog post by Chris Lowis on Synthesising Drum Sounds with the Web Audio API and also Synthesizing Hi-Hats with Web Audio by Joe Sullivan. I learnt many new things just by reading those articles and also refering to the SYNTH SECRETS articles by Sound on Sound Magazine.
What we’re going to do today is to synthesise the sounds of a kick drum, hi-hat and snare.
What is sound synthesis?
It’s basically a technique that is used to generate sound using electronic hardware or software from scratch. There are many types of synthesis methods, here is a very informative article on it.
From Chris Lowis’s article:
“Synthesising, recreating the sound of a drum using a model of its acoustics and attempting to recreate that model in code, gives us infinite control, but it can be very difficult to accurately synthesise a realistic sounding drum.”
Oh yeah I agree.
The drum sounds that I synthesised may not be the best sounding ones but the process of learning about how to do it really deepened my understanding of sound synthesis so I hope this blog post will help you the same way. In fact you could probably do it better than me once you’ve understood the fundamentals!
Well then what are we waiting for? Lets start coding!
Synthesising the kick drum
Before I even begin writing code, it’s good to have an outline of what we’ll need. So here’s a simple graph.
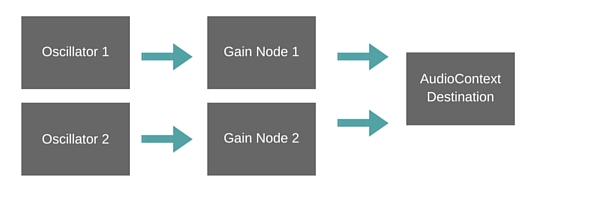
You must be wondering why I’m using two oscillators! It’s possible to synthesise a kick sound using just one oscillator but the kick sounded too weak and soft so I decided to use two oscillators and layer the sounds together. I like “phat” beats.
We start by creating the audioContext. Without this nothing will work of course.
window.AudioContext = window.AudioContext || window.webkitAudioContext;
var audioContext = new AudioContext();
Then we create our Oscillator nodes and Gain nodes using the createOscillator() and createGain() methods.
var osc = audioContext.createOscillator();
var osc2 = audioContext.createOscillator();
var gainOsc = audioContext.createGain();
var gainOsc2 = audioContext.createGain();
I’m sure you can find better variable names for those but I like to keep it simple and straight to the point.
Then we define the type of oscillators we’re going to use.
osc.type = "triangle";
osc2.type = "sine";

osc.frequency.value = 40;
osc2.frequency.value = 80;
At this moment in time, if you were to listen, it sounds like this.
Here comes the part where our knowledge of audio params comes in handy! If you’re not sure what that is, do check out our previous blog post on Understanding AudioParams. AudioParams are integral in letting us manipulate audio using Web Audio API and if you haven’t check that out you, you should!
Moving on! So what happens here is that we have to automate the amplitude and frequency of both our oscillator and gain nodes. To understand why that is, we have to take a look at this waveform of a kick drum.
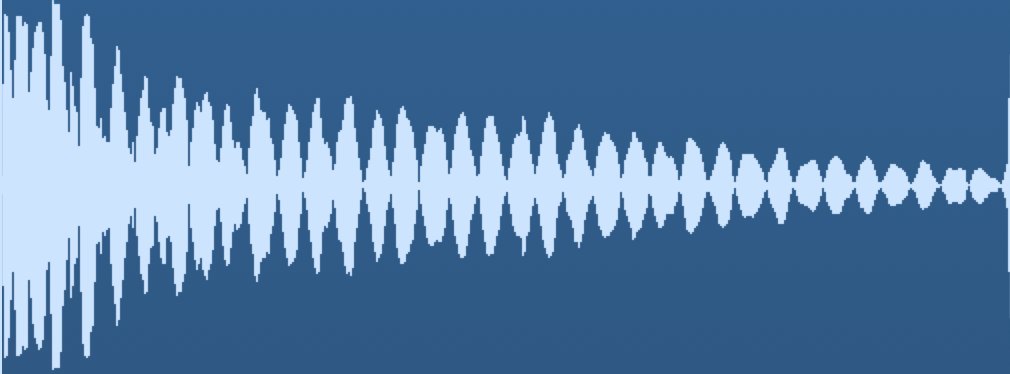
As you can see, the sound of a kick drum starts off with high attack and falls away rapidly. So to emulate this, we can use the methods setValueAtTime(), linearRampToValueAtTime() or exponentialRampToValueAtTime().
gainOsc.gain.setValueAtTime(1, audioContext.currentTime);
gainOsc.gain.exponentialRampToValueAtTime(0.001, audioContext.currentTime + 0.5);

gainOsc2.gain.setValueAtTime(1, audioContext.currentTime);
gainOsc2.gain.exponentialRampToValueAtTime(0.001, audioContext.currentTime + 0.5);
We’ll do the same for the frequency values as well.
osc.frequency.setValueAtTime(120, audioContext.currentTime);
osc.frequency.exponentialRampToValueAtTime(0.001, audioContext.currentTime + 0.5);

osc2.frequency.setValueAtTime(50, audioContext.currentTime);
osc2.frequency.exponentialRampToValueAtTime(0.001, audioContext.currentTime + 0.5);
Then we do the connections!
osc.connect(gainOsc);
osc2.connect(gainOsc2);
gainOsc.connect(audioContext.destination);
gainOsc2.connect(audioContext.destination);
Sometimes you might want to insert another gain node to combine gainOsc and gainOsc2 before connecting to the audioContext.destination because then you would be able to have more control over the volume.
Other than that our final steps would be to start and stop our oscillators.
osc.start(audioContext.currentTime);
osc2.start(audioContext.currentTime);

osc.stop(audioContext.currentTime + 0.5);
osc2.stop(audioContext.currentTime + 0.5);
Do take note that we are only able to start and stop the oscillators only once, so what I did was to put everything in a function called kick() like this.
function kick() {

    var osc = audioContext.createOscillator();
    var osc2 = audioContext.createOscillator();
    var gainOsc = audioContext.createGain();
    var gainOsc2 = audioContext.createGain();

    osc.type = "triangle";
    osc2.type = "sine";

    gainOsc.gain.setValueAtTime(1, audioContext.currentTime);
    gainOsc.gain.exponentialRampToValueAtTime(0.001, audioContext.currentTime + 0.5);

    gainOsc2.gain.setValueAtTime(1, audioContext.currentTime);
    gainOsc2.gain.exponentialRampToValueAtTime(0.001, audioContext.currentTime + 0.5);

    osc.frequency.setValueAtTime(120, audioContext.currentTime);
    osc.frequency.exponentialRampToValueAtTime(0.001, audioContext.currentTime + 0.5);

    osc2.frequency.setValueAtTime(50, audioContext.currentTime);
    osc2.frequency.exponentialRampToValueAtTime(0.001, audioContext.currentTime + 0.5);

    osc.connect(gainOsc);
    osc2.connect(gainOsc2);
    gainOsc.connect(audioContext.destination);
    gainOsc2.connect(audioContext.destination);

    osc.start(audioContext.currentTime);
    osc2.start(audioContext.currentTime);

    osc.stop(audioContext.currentTime + 0.5);
    osc2.stop(audioContext.currentTime + 0.5);

};
However would I highly recommend you refer to Chris Lowis’s way of wrapping his code in an object which I think is a more elegant solution.
Click to hear the kick drum!
Synthesising the snare drum
Moving forward, it’s time to synthesise our snare sound! It should be easier now to follow since the concept is pretty similar. I found this article about snare drum synthesis from Soundonsound very informative.
Basically how a snare drum works is that when you hit it, there’s a series of wire springs underneath it that rattles. That rattling can be synthesised using a burst of noise.
So how do we make noise using web audio?
We use a random number generator! Here is an awesome article on generating different kinds of noise using web audio.
function noise() {

    var node = audioContext.createBufferSource(),
        buffer = audioContext.createBuffer(1, 4096, audioContext.sampleRate),
        data = buffer.getChannelData(0);

    for (var i = 0; i < 4096; i++) {

        data[i] = Math.random();
    }

    node.buffer = buffer;
    node.loop = true;
    node.start(audioContext.currentTime);
    node.stop(audioContext.currentTime + 0.2);
    node.connect(audioContext.destination);
};
Before we move on, lets have a graph of how we’re going to do our connections!
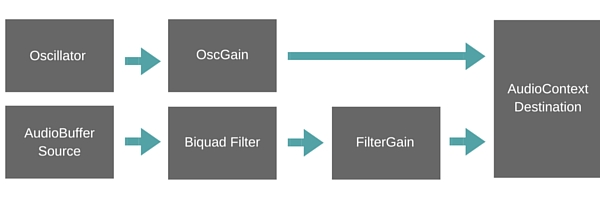
Once again it might be good to have another Gain node infront of OscGain and FilterGain so that you can control the volume but it’s up to your preferences.
As you can see I’ve added a filter in the signal flow, this is because we would want to remove any low frequencies generated by the noise to create a more realistic snare sound.
var filter = audioContext.createBiquadFilter();
    filter.type = "highpass";

    filter.frequency.setValueAtTime(100, audioContext.currentTime);
    filter.frequency.linearRampToValueAtTime(1000, audioContext.currentTime + 0.2);
Now lets add an oscillator and gain node to create that sharp percussive sound.This helps the snare sound become much fuller. This is the same technique that we used to create the kick sound.
var osc3 = audioContext.createOscillator();
var gainOsc3 = audioContext.createGain();

osc3.type = "triangle";
osc3.frequency.value = 100;

gainOsc3.gain.setValueAtTime(0, audioContext.currentTime);
gainOsc3.gain.exponentialRampToValueAtTime(0.01, audioContext.currentTime + 0.1);
Now lets listen to how the snare sounds like.
I enjoy the fact that my snare sounds like someone is being slapped (Trigger warning! I do not advocate violence).
Synthesising the hi-hat
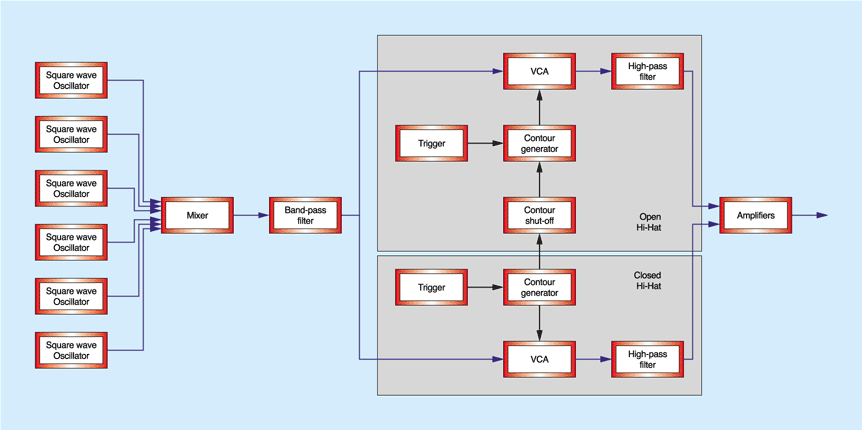
Having referred to Chris Lowis’s Synthesising Drum Sounds with the Web Audio API, Joe Sullivan’s Synthesizing Hi-Hats with Web Audio and this diagram, I have to say that synthesising hi-hats is tedious.
So what we’re going to do is to make a web audio, condensed version of that diagram.
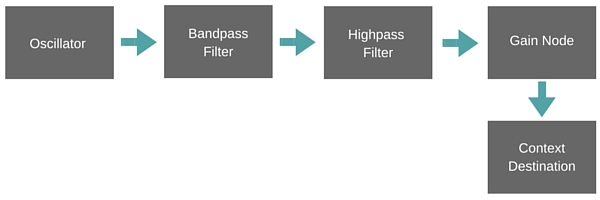
That looks more doable!
So lets see, based on the very first diagram, the hi-hat starts off with an array of square waves. So does this mean that we’re going to create 6 oscillators?
Nope! It’s because of this lovely bunch of code by Joe Sullivan.
var fundamental = 40;
var ratios = [2, 3, 4.16, 5.43, 6.79, 8.21];

ratios.forEach(function(ratio) {

        var osc4 = audioContext.createOscillator();
        osc4.type = "square";
        osc4.frequency.value = fundamental * ratio;
        osc4.connect(audioContext.destination);

        osc4.start(audioContext.currentTime);
        osc4.stop(audioContext.currentTime + 0.05);

    });
As you can hear, the sound of 6 square waves is quite massive. So our next step would be to run it through a bandpass filter.
var bandpass = audioContext.createBiquadFilter();

bandpass.type = "bandpass";
bandpass.frequency.value = 10000;
Awesome! We’re getting there! Now we should refine it a bit so it sounds more percussive. Similarly to how we automated the amplitude for our kick drum and snare, we’re going to use our gain node to set the envelope.
gainOsc4.gain.setValueAtTime(1, audioContext.currentTime);
gainOsc4.gain.exponentialRampToValueAtTime(0.01, audioContext.currentTime + 0.05);
Finally we add our highpass filter to clear away the low frequencies and get that percussive hi-hat sound.
var highpass = audioContext.createBiquadFilter();

highpass.type = "highpass";
highpass.frequency.value = 7000;
Yay! We’re finally done synthesising! You can find the whole code here. Feel free to mess around with it!
See the Pen Synthesising Drum Sounds by Aqilah Misuary (@aqilahmisuary) on CodePen.